When ordering the ball joints, Sunbeam Specialties recommended that I replace the bushings in the control arms.  These bushings are two metal cylinders separated by rubber. The inner metal cylinder allows the control arms to pivot when the car goes over a bump and the wheels go up and down. The rubber insert isolates the car from road vibration. Unfortunately, the rubber deteriorates over time, making periodic replacement a good practice.
In the Sunbeam, control arm bushings are press fit, similar to the upper ball joints in the last post. As with the ball joints, I pressed them in and out using a tool borrowed from Advance Auto. 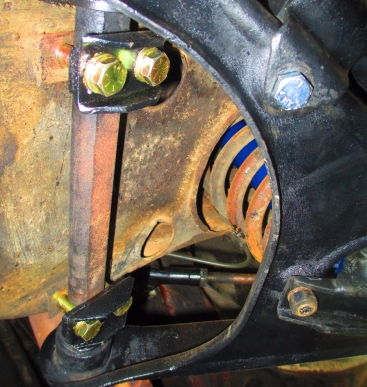 Just above, you can see the old bushing almost free from the control arm. The surface rust on the outer cylinder did not affect performance, but the rubber insert at the top of the picture was hard and brittle and probably led to a rough ride.
To the right is the lower control arm with new bushings installed. The view is from the bottom of the car looking up. The large square rod is connected to the frame (with new bolts). Toward each end, the rod becomes round and passes through the bushings. The rod is called a fulcrum pin, and with this design, the control arm can pivot up and down to accommodate bumps in the road.
With the front suspension taken apart, I looked at the sway bar and its bushings. The bar is a thick rod of spring steel  that connects the left and right control arms. The purpose is to reduce body roll when turning. All cars tend to tilt or sway when going around a sharp curve, and this can be uncomfortable for passengers. It also reduces the tires’ grip on the road and is therefore a safety item. Here is the sway bar arm on the garage floor.
On inspection, the bar itself looked in good shape, save for orange paint and some surface rust. Some sanding and new black paint took care of these problems.
The rubber bushings were another story. You can easily see the crack in the example on the right. These simply slip onto the bar, and no special tools are needed. A little silicone spray, and the sway bar is ready to install.
Returning the sway bar to the car was a little more difficult because it is a spring under tension. There could be a “right way,” but I simply bolted the two mounts on the left side of the car to the control arm and then used a jack to to push the right side into place. 
You can see the sway bar in place on the bottom of the last picture. The camera is looking up at the lower control arm. One bushing is visible in the lower left if the photo; it is the black rubber circular part with the thick rod passing through it.
How did all of this work turn out? I hadn’t observed any problems with the front suspension and steering before undertaking the repairs, but a few test drives after reveal a marked improvement in ride and handling. And I am more confident now that all critical front suspension and most steering components have been replaced.
